11/24/2015

Custom Build System for PHP Scripts: Sublime3


# Sublime3 : Custom Build System for PHP

## Helps to run and debug PHP Scripts directly using Sublime3
## Note: PHP Binary ( php.exe ) should be within SYSTEM PATH
Otherwise You should edit Build System and paste absolute Path for php.exe binary

# Code 


 1
 2
 3
 4
 5
 6
 7
 8
 9
10
11
12
13
14
15
16
17
18
19
20
21
22
23
24
25
26
27
28
29
30
31
32
33
34
35
36
37
38
39
40
41
42
43
44
45
46
{
 "shell_cmd": "php.exe -f  \"${file}\"",
 "file_regex": "^(..[^:]*):([0-9]+):?([0-9]+)?:? (.*)$",
 "working_dir": "${file_path}",
 "selector": "source.php, source.php4, source.php5",

 "variants":
 [
  {
   "name": "Run with CMD",
   "shell_cmd": "start cmd.exe /k php.exe -f  \"${file}\""
  },
  {
   "name": "Run and Only Lint PHP Code",
   "shell_cmd": "start cmd.exe /k php.exe -l  \"${file}\""
  },
  {
   "name": "Start PHP Development Server",
   "shell_cmd": "start cmd.exe /k php.exe -S 127.0.0.10:8080 -t \"${file_path}\""
  },
  {
   "name": "Launch Home Page for Server (Google Chrome)",
   "shell_cmd": "start chrome http://127.0.0.10:8080"
  },
  {
   "name": "Launch Home Page for Server (Mozilla Firefox)",
   "shell_cmd": "start firefox http://127.0.0.10:8080"
  },
  {
   "name": "Launch Home Page for Server (Explorer)",
   "shell_cmd": "start http://127.0.0.10:8080"
  },
  {
   "name": "Launch Home Page for Server (MS Edge)",
   "shell_cmd": "start microsoft-edge:http://127.0.0.10:8080"
  },
  {
   "name": "Launch Home Page for Server (Internet Explorer)",
   "shell_cmd": "start iexplore http://127.0.0.10:8080"
  },
  {
   "name": "Generate Syntax Highlighted Code and Copy to Clipboard",
   "shell_cmd": "php.exe -s \"${file}\" | clip"
  }
 ]
}

# Video Tutorial


Encrypt Sensitive Information within URLs using PHP

In This blog post, we will do some tests to Encrypt and Decrypt Plain Text using PHP. This is sometimes useful, suppose you have urls like this http://www.somesite.com/users/1 and this is not safe, because your users can manipuate this to get some information that is not for them. So, What is you can change that URL into like this, http://www.somesite.com/users/iopiqowialkjsdkjdnzmnzmv This URL is more safe, all You need to do is, extract encoded string from URL and Decrypt it to get Plain Text Infomation.

Note: we are using PHP MCrypt Module


<?php 

# __identity__ : EncryptionOperations

/*
* EncryptionOperations.comp.php
* Useful Methods for Encoding and Decoding URL sensitive Information
* @methods
    public static function encryptStringBymCrypt($plaintext)
    public static function decryptStringBymCrypt($ciphertext_base64) 

*/

trait EncryptionOperations
{
 public static $salt = "bcb04b7e103a0cd8b54763051cef08bc55abe029fdebae5e1d417e2ffb2a00a3";
 /*
 * To encode URL normal text (Using  mcrypt  library)
 * @param - Plain text
 */
 public static function encryptStringBymCrypt($plaintext)
 {
  # --- ENCRYPTION ---
  # Pack data into binary string
        $key = pack('H*', self::$salt);
        # show key size use either 16, 24 or 32 byte keys for AES-128, 192
        # and 256 respectively
        $key_size =  strlen($key);

        # create a random IV to use with CBC encoding
        ## int mcrypt_get_iv_size ( string $cipher , string $mode )
        ### Returns the size of the IV belonging to a specific cipher/mode combination
        $iv_size = mcrypt_get_iv_size(MCRYPT_RIJNDAEL_128, MCRYPT_MODE_CBC);
        # string mcrypt_create_iv ( int $size [, int $source = MCRYPT_DEV_URANDOM ] )
        ## Creates an initialization vector (IV) from a random source
        $iv = mcrypt_create_iv($iv_size, MCRYPT_DEV_URANDOM);

        # creates a cipher text compatible with AES (Rijndael block size = 128)
        # to keep the text confidential 
        # only suitable for encoded input that never ends with value 00h
        ## (because of default zero padding)
        # string mcrypt_encrypt ( string $cipher , string $key , string $data , string $mode [, string $iv ] )
        ## Encrypts plaintext with given parameters
        $ciphertext = mcrypt_encrypt(MCRYPT_RIJNDAEL_128, $key, $plaintext, MCRYPT_MODE_CBC, $iv);

        # prepend the IV for it to be available for decryption
        $ciphertext_enc = $iv . $ciphertext;
        
        # encode the resulting cipher text so it can be represented by a string
        $ciphertext_base64 = base64_encode($ciphertext_enc);
        return rawurlencode($ciphertext_base64);
    }

 /*
 * To decode URL normal text (Using  mcrypt  library)
 * @param - Base64 text string
 */
 public static function decryptStringBymCrypt($ciphertext_base64) 
 {
        # --- DECRYPTION ---
        $key = pack('H*', self::$salt);

        # show key size use either 16, 24 or 32 byte keys for AES-128, 192
        # and 256 respectively
        $key_size =  strlen($key);

        # create a random IV to use with CBC encoding
        $iv_size = mcrypt_get_iv_size(MCRYPT_RIJNDAEL_128, MCRYPT_MODE_CBC);
        $iv = mcrypt_create_iv($iv_size, MCRYPT_DEV_URANDOM);

        $ciphertext_dec = base64_decode(rawurldecode($ciphertext_base64));

        # retrieves the IV, iv_size should be created using mcrypt_get_iv_size()
        $iv_dec = substr($ciphertext_dec, 0, $iv_size);

        # retrieves the cipher text (everything except the $iv_size in the front)
        $ciphertext_dec = substr($ciphertext_dec, $iv_size);

        # may remove 00h valued characters from end of plain text
        $plaintext_dec = mcrypt_decrypt(MCRYPT_RIJNDAEL_128, $key, $ciphertext_dec, MCRYPT_MODE_CBC, $iv_dec);
        return $plaintext_dec;
    }

    function encryptStringasHex($plaintext)
    {
        $iterations = 1000;
        $hash_length = 64;
        # Secret Key
        $secret_key = pack('H*', self::$salt);
        # Random IV for Encryption ...
        $secret_iv = mcrypt_create_iv(mcrypt_get_iv_size(MCRYPT_RIJNDAEL_128, MCRYPT_MODE_CBC), MCRYPT_DEV_URANDOM);
        
        // $hashsha256 = hash_pbkdf2("sha256", $plaintext, $secret_iv, $iterations, $hash_length);
        $ciphertext = mcrypt_encrypt(MCRYPT_RIJNDAEL_128, $secret_key, $plaintext, MCRYPT_MODE_CBC, $secret_iv);
        $cipher_enc = $secret_iv . $ciphertext;
        return bin2hex($cipher_enc);
    }

    function decryptHexasString($encoded_string)
    {
        # Secret Key
        $secret_key = pack('H*', self::$salt);
        # Random IV for Encryption ...
        $secret_iv_size = mcrypt_get_iv_size(MCRYPT_RIJNDAEL_128, MCRYPT_MODE_CBC);
        // $secret_iv = mcrypt_create_iv($secret_iv_size, MCRYPT_DEV_URANDOM);
        # Hex to Bin $encoded_string
        $userdata = hex2bin($encoded_string);
        # Extract $secret_iv and $secret_data from bin
        $secret_iv = substr($userdata, 0, $secret_iv_size);
        $secret_data = substr($userdata, $secret_iv_size);
        # Now Decrypt Data
        $plaintext_dec = mcrypt_decrypt(MCRYPT_RIJNDAEL_128, $secret_key, $secret_data, MCRYPT_MODE_CBC, $secret_iv);
        return $plaintext_dec;
    }

}


// # Main Test Case (11-12-2015)
class Demo
{
    use EncryptionOperations;
    function __construct()
    {
        $this->hello = "simple hello world";
    }
}


# Test case 1
$i = new Demo();
$j = $i->encryptStringBymCrypt("simple hello world and awesome work so far this is just simple and great");
$j = $i->decryptStringBymCrypt("XSDflmFYdqWJrgML6LyUTNH6zl3rEVRSxijljfayig48h1cN0r88VSuJLKMlIxRclV29yKEZ%2BNyDzyjrm5E%2FwEHB6EKPkyp6bbgkfU7GpoGuCAzrUFK18mNAubAM2ukc");
// echo $j
echo rtrim($j)


# Test Case 2
$a = new Demo();
echo Demo::encryptStringasHex("hello wold");
$b = Demo::decryptHexasString("27960504158a4c4ceeee1650ab9686027b47af826b9e69fe5fe34d33872e75d6");
echo rtrim($b);


?>


11/19/2015

Find and Replace multiline text String in HTML Files using Powershell (No Regular Expression)

Sometimes we have a bunch of text files or HTML files and all we wanted to do with them is quickly find and replace some HTML content with new HTML content, Find and Replace also works great in normal Code Editors, So that You can perform, find and replace operation.
But, Here we are talking about a bunch of files, may be 10000 or more ...
Yeah, In this situation we need to write a program to do this job, OK, Why not use PowerShell, it can do this within a few lines of code.


# Steps
  1. Generate a List of files
  2. What You are looking for ( $oldstring )
  3. Replace that with this
  4. Loop through Each and every file and write processed content to either New Location (recommended) or Overwrite existing content


 # Window PowerShell Code

# Generating a List of Files
$filelist = ls -Filter *.html -Recurse

#case - 1 
# What You are looking for ... 
$old = "<script>
    var _gaq = _gaq || [];
    _gaq.push(['_setAccount', 'UA-19201920192102-1']);
    _gaq.push(['_setDomainName', 'helloworld.com']);
    _gaq.push(['_setAllowLinker', true]);
    _gaq.push(['_trackPageview']);

    (function() {
    var ga = document.createElement('script'); ga.type = 'text/javascript'; ga.async = true;
    ga.src = ('https:' == document.location.protocol ? 'https://ssl' : 'http://www') + '.google-analytics.com/ga.js';
    var s = document.getElementsByTagName('script')[0]; s.parentNode.insertBefore(ga, s);
    })();
</script>"
# Now find and replace all NewLine Characters with a Space Character 
# Note: This will make you code UGLY, but You can make beautify again some tools like (Tidy)
# Or You can do this Simple trick...
# # Here we are replacing NEWLINE character with a space character, but You can replace NEWLINE Character with 
# # Your custom code template and When You are done, replace back Your custom code template with NEWLINE Character
# # This way You can preserve readblity of code as well...
# # Example: 
# $old = $old -replace "`r`n", " __NEWLINE__ "

$old = $old -replace "`r`n", " "
# Find $old and replace with $new
$new = " "


# Main Code to loop through each and Every File ...
$filelist.ForEach({ 
	# $old = $old -replace "`r`n", " __NEWLINE__ "
	$i = (Get-Content $_.fullname -Encoding UTF8 -Raw) -replace "`n", " "; 
	$j = $i.Replace($old, $new);
	Out-File -FilePath $_.fullname -Encoding UTF8 -InputObject $j;
})


11/12/2015

Associate Some Type of File with Some Program (Windows)


Did You even notice that when you double click some file in Windows Explorer, Some program will open that file for you. How does Explorer remember that THIS Type of file should be opened with THIS Program. So, This behavior is managed by File Type Association Record, and THIS record is saved in Windows Registry. OK, Now we will take a look at all Possible way to associate some kind of file with some program.

Some Kind or Type of File only refers to File Extension, By Default, in Windows You will not be able to see file extension, But i am assuming You are familiar with Media Files, like Audio and Video Files, and You may know that mp3 files, means File Extension is .mp3 So, for example, sample_media_file.mp3 (File Extension is .mp3) and some video file, like sample_media_file.mp4 (File Extension is .mp4), sample_media_file.mkv

Method 1 (Manual Method)

  • We want to change program to open .mp4 files.
  • Right Click on File and in Context menu click, Properties
  • Now in Properties -> General Tab Click Change Button
  • New windows appears asking you to choose any program from list, If Program that you are looking for, is not in list, then you manually locate that program.
  • After choosing/Selecting THAT program, Click Apply button and then OK Button
Note:
  1. This Method Generate File Type Association Registry only for Current User. You can look at Generated Registry using regedit.exe
HKEY_CURRENT_USER\Software\Microsoft\Windows\CurrentVersion\Explorer\FileExts.mp4
  1. Command line that will be Executed when you Double click on some .mp4 file. program.exe %1

Method 2 (Using Command Line)

  • In this Method we will be using two command line programs (ASSOC and FTYPE)
  • Lets take a look at assoc program help
C:\Windows\system32>assoc /?
Displays or modifies file extension associations

ASSOC [.ext[=[fileType]]]

.ext      Specifies the file extension to associate the file type with
fileType  Specifies the file type to associate with the file extension

Type ASSOC without parameters to display the current file associations.
If ASSOC is invoked with just a file extension, it displays the current
file association for that file extension.  Specify nothing for the file
type and the command will delete the association for the file extension.
  • We want to declare all files with .mp4 extension as MediaFile
assoc .mp4=MediaFile
  • Now take a look at ftype program help
C:\Windows\system32>ftype /?
Displays or modifies file types used in file extension associations

FTYPE [fileType[=[openCommandString]]]

fileType  Specifies the file type to examine or change
openCommandString Specifies the open command to use when launching files
of this type.

Type FTYPE without parameters to display the current file types that
have open command strings defined.  FTYPE is invoked with just a file
type, it displays the current open command string for that file type.
Specify nothing for the open command string and the FTYPE command will
delete the open command string for the file type.  Within an open
command string %0 or %1 are substituted with the file name being
launched through the assocation.  %* gets all the parameters and %2
gets the 1st parameter, %3 the second, etc.  %~n gets all the remaining
parameters starting with the nth parameter, where n may be between 2 and 9,
inclusive.  For example:

ASSOC .pl=PerlScript
FTYPE PerlScript=perl.exe %1 %*

would allow you to invoke a Perl script as follows:

script.pl 1 2 3

If you want to eliminate the need to type the extensions, then do the
following:

set PATHEXT=.pl;%PATHEXT%

and the script could be invoked as follows:

script 1 2 3
  • Now we need to define command line that should be executed every time User Double Click on .mp4 Files.
ftype MediaFile="C:\Program Files\MPV_Player\mpv.exe" "%1"
  • Equivalent Registry generated because of these two Commands ( assoc and ftype )
----------------------------------
Keys added:5
----------------------------------
HKLM\SOFTWARE\Classes\.mp4
HKLM\SOFTWARE\Classes\MediaFile
HKLM\SOFTWARE\Classes\MediaFile\Shell
HKLM\SOFTWARE\Classes\MediaFile\Shell\Open
HKLM\SOFTWARE\Classes\MediaFile\Shell\Open\Command

----------------------------------
Values added:2
----------------------------------
HKLM\SOFTWARE\Classes\.mp4\: "MediaFile"
HKLM\SOFTWARE\Classes\MediaFile\Shell\Open\Command\: "C:\Program Files\MPV_Player\mpv.exe" "%1"

Method 3 (Using PowerShell)

  • Windows PowerShell is really cool, because this allows you to work with Windows Registry the same way as you work with FileSystem.
cd HKLM:
New-Item .\SOFTWARE\Classes\.001 -Value "first"
New-Item .\SOFTWARE\Classes\first
New-Item .\SOFTWARE\Classes\first\shell
New-Item .\SOFTWARE\Classes\first\shell\open
New-Item .\SOFTWARE\Classes\first\shell\open\command -Value '"mpv.exe" "%1"'

General Method (Add/Modify Both Global as well as Local Registry)


WHY?

To associate some type of files with some program, all You need to do is run the following command. assoc ftype
But if User choose some program manually, then Explorer create a list of program with first index for previously chosen User Program, This is why in this case, First You need to execute both above commands after that You have to add THIS application to User Chosen Programs and Update Index.
Now, When User Double click on THAT kind of File, Explorer will give him/her a choice that Hey! I found this New Program, That may be chosen by You, But The second one will be what You chosen last time.


Command Line Method

@rem -- setup a new application and path for application
REG ADD "HKEY_CLASSES_ROOT\Applications\mpv.exe\shell\open\command" /v @ /t REG_SZ /d "\"F:\Softwares\mpv\mpv.exe\"  --autofit=50%% --force-window --ontop --no-border \"%%1\"" /f
@rem -- register THIS file type to use THAT application
REG ADD "HKEY_CURRENT_USER\Software\Microsoft\Windows\CurrentVersion\Explorer\FileExts\.mp4" /v "Application" /t REG_SZ /d "mpv.exe" /f
REG ADD "HKEY_CURRENT_USER\Software\Microsoft\Windows\CurrentVersion\Explorer\FileExts\.mp4\OpenWithList" /v "g" /t REG_SZ /d "mpv.exe" /f
REG ADD "HKEY_CURRENT_USER\Software\Microsoft\Windows\CurrentVersion\Explorer\FileExts\.mkv\OpenWithList" /v "MRUList" /t REG_SZ /d "gabcdef" /f

assoc .mp4=MediaFile
ftype MediaFile="F:\Softwares\mpv\mpv.exe" --autofit=50%%%% --force-window --ontop --no-border "%%1"

PowerShell Method

# Register a New Application (demo.exe) and command line string for it ..
cd HKLM:\SOFTWARE\Classes\Applications\
New-Item demo.exe
New-Item demo.exe/shell
New-Item demo.exe/shell/open
New-Item demo.exe/shell/open/command -Value 'C:\demo.exe %1 --full'

# Now Associate Your Program (demo.exe) with Some File Type (Example, .001)
cd HKCU:\Software\Microsoft\Windows\CurrentVersion\Explorer\FileExts\
New-Item .001
cd .001
# Update OpenWith applications list
New-Item OpenWithList
Set-ItemProperty -Name g -Value demo.exe -Path OpenWithList
Set-ItemProperty -Name MRUList -Value gabcdef -Path OpenWithList

11/06/2015

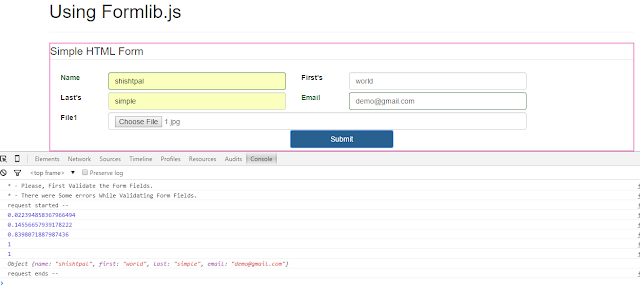
Process HTML Form data, Validate it and Submit to the Server Using formlib.js - jQuery

formlib.js


My new JavaScript Library based on jQuery to Process, Validate and Submit HTML Forms


What if i tell you that, this can do the job of HTML Form Processing ( It can Validate input fields data as well as can Submit Form data to Server, When You submit the Form)

Why formlib.js

  • formlib.js is a JavaScript Library, based on jQuery.js and HTML markup is based on bootstrap.css
  • Lightweight and every parameter is Configurable
  • Can Inject Progressbar HTML markup bootstrap.css and Update it Automatically

How To Use

  • Include formlib.js into your webpage
  • Write HTML Markup (Bootstrap.css - form-horizontal class) for Your Form
  • Copy CSS Path to Form
  • Create a New Object of ProcessForm Class by passing CSS Path to Form
  • Define Configuration Object and call config method for ProcessForm Object
  • successCall is Important, actually this is a Function, that should be called when Form Successfully Processed and Submitted to the Server (Backend)
  • There is a Demo HTML file index.php that you can Download and test using PHP Server.

Download

formlib.js from github.com

Sample JavaScript Code

var i = new ProcessForm("#simpleform");
var j = {
    /* I do not want tooltips */
    "injectTooltip": false,
    /* I do not want to show BS Icons for OK and Cancel */
    "injectBSIcon": false,
    "successCall" : function(i){ console.log(i); },
    "errorCall": function(i){ console.log(i); },
    'progressbar': "#progressbar",
    'validator': {
        'name': {
            "func": 'isUserName',
            "msg": "Please, Enter a Valid User Name"
        },
        "email": {
            "func": "isValidEmail",
            "msg": "Please, Enter a Valid Email Address"
        }
    }
};
i.config(j);

Sample Bootstrap based HTML Form Code

<form action="/demo.php" class="form-horizontal0 " id="simpleform" method="POST" style="border:2px solid rgba(228, 45, 172, 0.6);">
<fieldset>
    <legend>Simple HTML Form</legend>
    <div class="form-group">
        <label for="name" class="control-label col-xs-1">Name</label>
        <div class="col-xs-4">
            <input type="text" class="form-control" name="name">
        </div>
    </div>
    <div class="form-group">
        <label for="first" class="control-label col-xs-1">First's</label>
        <div class="col-xs-4">
            <input type="text" class="form-control" name="first">
        </div>
    </div>
    <div class="clearfix"></div>
    <div class="form-group">
        <label for="last" class="control-label col-xs-1">Last's</label>
        <div class="col-xs-4">
            <input type="text" class="form-control" name="last">
        </div>
    </div>
    <div class="form-group">
        <label for="email" class="control-label col-xs-1">Email</label>
        <div class="col-xs-4">
            <input type="text" class="form-control" name="email">
        </div>          
    </div>
    <div class="clearfix"></div>
    <div class="form-group">
        <label for="file1" class="control-label col-xs-1">File1</label>
        <div class="col-xs-9">
            <input type="file" class="form-control" name="file1">
        </div>
    </div>
    <div class="form-group">
        <div class="col-xs-12" id="progressbar"></div>
    </div>
    <div class="form-group" style="max-width: 200px;margin: 5px auto;">
        <input id="simpleformsubmit" class="btn btn-primary btn-block" type="submit" name="Click" value="Submit">
    </div>
</fieldset>
</form> 


Formlib.js - By Shishtpal Singh